You’ll never have too many! Cables are essential to connect all your gear and make it work as it should. There are a lot of types of cables. Let’s start with the most famous analog ones: Jack and XLR. The former is mostly used for line instruments (synths, guitars, bass…) and can be TRS (tip, ring and sleeve) hence stereo or TS (tip, sleeve) or mono. XLR cables snap into place and they’re commonly used to transmit a balanced signal when recording.
RCA cables are recognizable because of their white and red heads. They’re mostly used for analogue audio devices (like a tape recorder) to achieve stereo and are super common in DJ equipment.
In recent times digital cables have become a staple in countless studios. We’re talking about MIDI cables that for instance send digital information (like tempo and notes) from your DAW to your synth. USB cables are also a modern producer’s bread and butter, as many pieces of gear now feature USB connectivity to take a lot of hassle off your shoulders.
If you want a quick fix to have all your recording staples in one place, might be worth having a look at our bundles! You’ll find audio interfaces with mics and accessories and speakers with cables to get you going in no time!
Part II: Taking your first steps into music production
Now that you have all the gear, it’s time to get your hands dirty creating your first track. In this section we’re going to give you some tips and tricks regarding all the different life stages of a song. But first, here are some key terms that are a producer’s bread and butter.
A basic music production glossary
- ADSR: This acronym stands for Attack, Decay, Sustain, Release. Together they form the ‘envelope’ of a sound. This term is mostly found on synths and is essential to shape their sound. Turning up the attack will result in a softer start of your note, turning up the release will have your sound fading in volume over a longer interval of time once you’ve released the key, short decay means a short burst of sound. Play around for unique results.
- Audio Sample Rate: it’s a measure that determines the number of frequencies captured in digital audio. Major DAWs usually offer you 3 sample rate options: 44.1kHz, 48kHz and 96kHz. Let’s skip the Nyquist and physics explanation and go to the core. 44.1kHz is the standard sample rate used in CDs and many audio recordings. It reproduces frequencies up to 20kHz, which is the limit of the human ear. Higher sample rates like 48kHz and 96kHz mean more measurements per second, so a more faithful reproduction of the original sound. There are no rules when deciding what sample rate to use, just be sure to stick to one in your project and don’t change it while it’s a work in progress!
- Bouncing: exporting an audio file to a format like wav or mp3. Can be done offline or in real-time (meaning you’ll hear the track playback. It’s standard practice when using outboard gear).
- Compression: Reducing the dynamic range of a sound to level out between loudest and quietest parts.
- DAW: stands for Digital Audio Workstation, and it’s the name indicating software for music production like Ableton, Cubase, Reason… where you can play, record, mix and master your tracks.
- EQ: Short for Equaliser. Equalisation is the process of removing or boosting certain frequencies inside a sound by reducing or increasing gain. For instance, you might want to remove very low frequencies that make a mix muddy or boost the high end in vocal tracks.
- FX: Short for Effect. Effects are many and different and they are fundamental tools to shape your sound. Common effects are reverb, delay, chorus, flanger and distortion. All DAWs have built-in plugin effects, you can also find them in the form of external devices, such as pedals.
- Gain: How loud a signal is before it enters an amp.
- Gate: It’s a tool helping you to remove certain frequencies below a specific threshold. It’s really useful if you want to create glitchy sounds.
- Input: The source of the audio chain. You usually connect an audio cable such as a TRS or an XLR to send audio data from your instrument or vocals.
- Jack: Another name for the TRS/TS cable.
- Latency: Latency is the time it takes for your hardware and software equipment to read the sound signal that’s being played, process it, and play it into your speakers. Your guitar sends an analogue signal that your software needs to turn into a digital one and back into an analogue one to play it to you. That process is responsible for latency.
- Loop: A repetition of an audio section.
- Mastering: The process of taking an audio mix and make it ready for distribution.
- MIDI: A digital language that allows digital music devices to communicate. It was first developed in the ‘80s, when the growing amount of digital hardware called for a standardised language to make them compatible.
- Mixing: the process of taking tracks and blending them together via volume adjustments, EQs, compressors, reverbs and more.
- Plugin: it’s a software add-on that enhances your DAW with effects, virtual instruments and processing tools.
- Sample: a piece of audio data taken from a larger file. It’s the smallest unit of measurement in digital sound.
- Stem: a stem is a sub mix of a larger mix. Stems are usually composed of the main elements of a song, i.e. drums, synths, vocals, backing tracks and so on, grouped together to go into the mixing phase.
- Tempo: The speed of music, usually measured in BPM (beats per minute)
- Tracking: the process of recording audio tracks that make a song.
- VST: Stands for Virtual Studio Technology. It’s a format for plugins to add instruments and effects to your DAW.
- Wet/Dry: It’s the balance between a processed signal and the original one. It’s usually found on effect plugins to determine how incisive they are on a sound.
Creating your first track

Although there is no formula to laying down a track, here are some tips to start jotting down your first ideas and developing your workflow. As we all know, multitracking is the standard way of recording music, where multiple tracks are recorded separately and combined in a mix.
Create a track to follow
One of the key steps when recording a song is finding a tempo or BPM. This will allow you to record all instruments in sync and craft a song structure. All DAWs have the option to activate a click track and some have the option to use ‘Tap’ tempo. This means you can click on a button following the rhythm you hear in your head and your DAW will set a BPM for you.
You can even use a pre-recorded drum loop, that you can find in your DAW’s library. That’s a really handy way to get a song started!
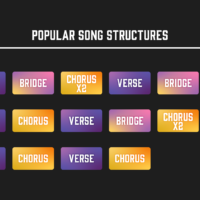
Song Structure
Again, nothing’s set in stone about a song structure. However, here are some of the most popular song patterns:
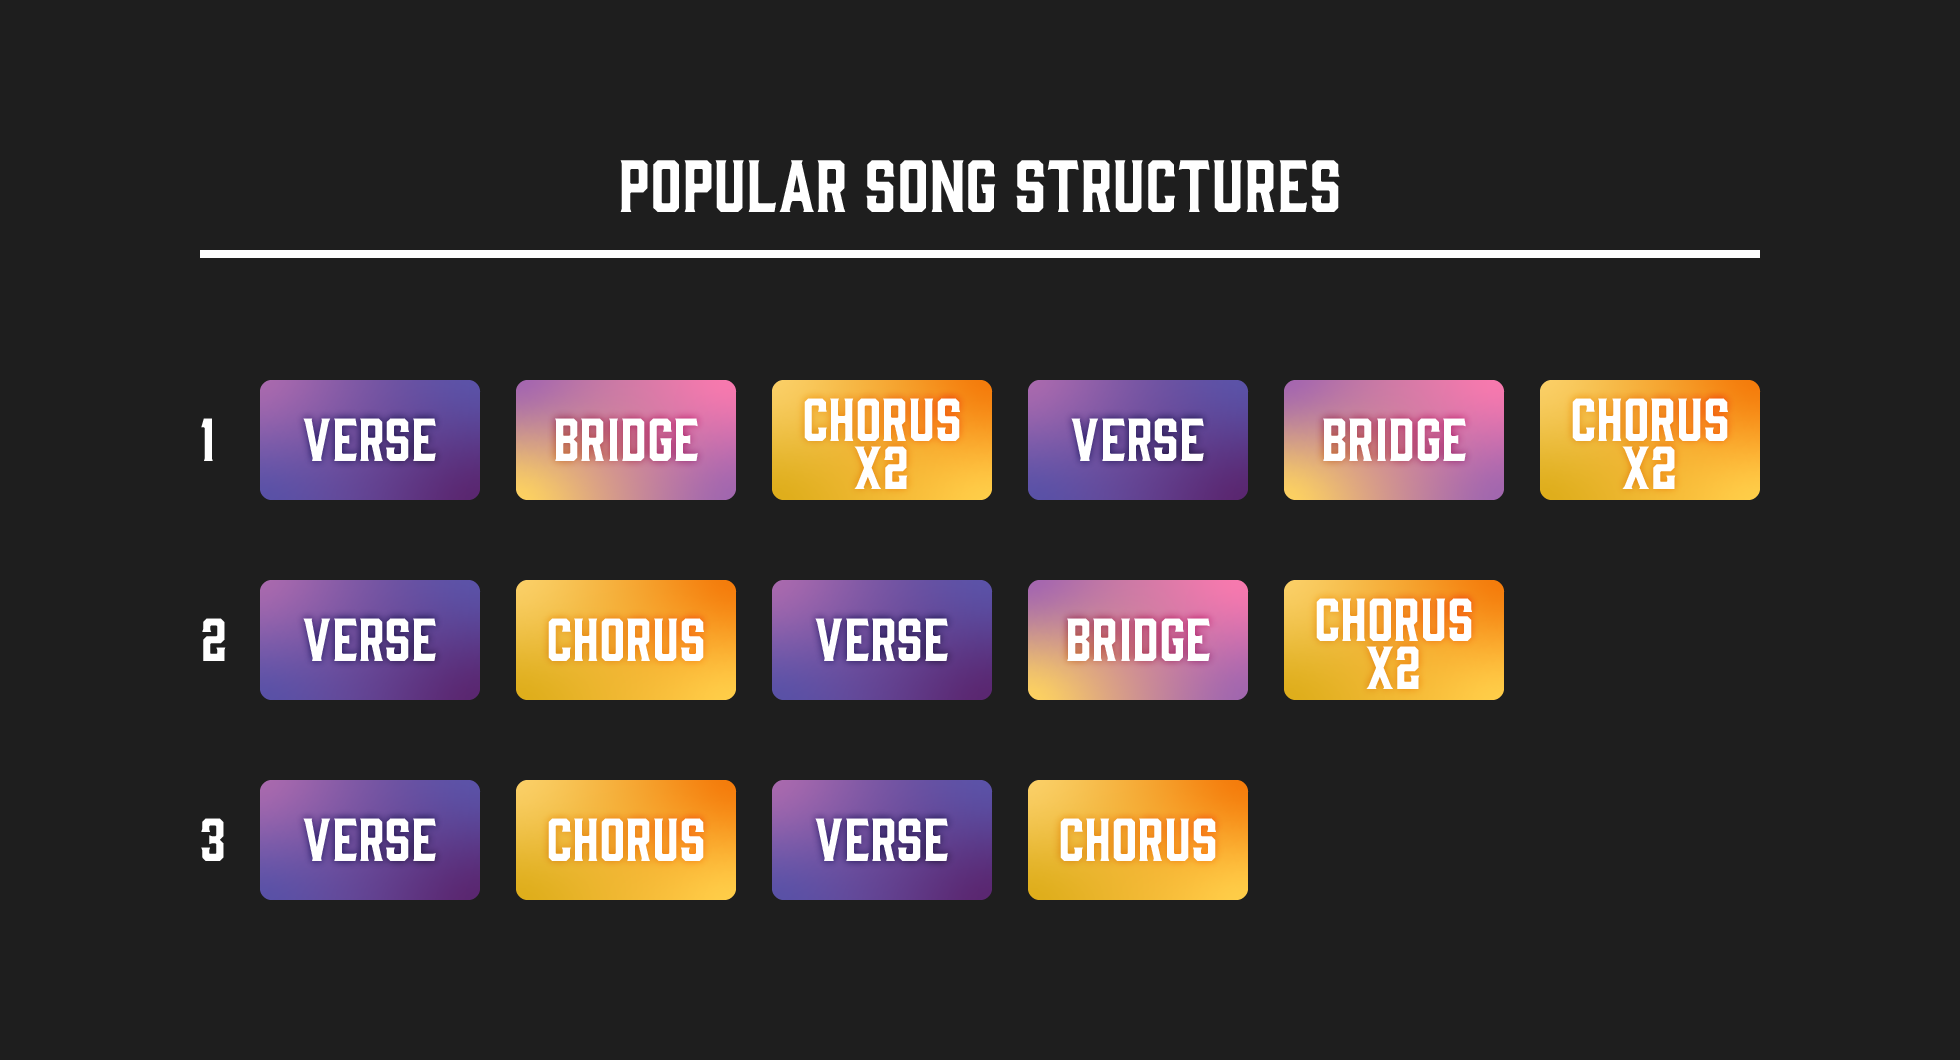
Bridge and Chorus are usually the most important parts: a bridge builds up the intensity which releases into the chorus, which is the more memorable part of the song.
Building Elements – Tracking
Once you have these sections in mind, you can start recording the elements of your song. A good idea is to write a chord progression, that can slightly change throughout the song. This can be the basis on which you start laying your bass, additional synths and vocals.
Don’t overlook the arranging phase: a song can get repetitive, even though it has all the right elements in place! Some ideas to spice up your mix are: removing some elements to create quieter and louder sections, including new instruments starting at different points, or change the panning (aka the direction the sound is coming from) of some instruments.
This is the real creative phase, so probably the best tip we can give is just to let things flow, not giving yourself restraints on what to use and how you should use it. Browse for samples that inspire you, use your gear in an unconventional way (tip: try sending MIDI from a synth to another!), use your vocal chops as percussions… The possibilities are endless!
Editing
Leave the editing phase for a later stage, after you’ve recorded all your tracks. This process is essential to clean up your vocals, select takes, adjust volumes and all the things that make your track ready for the mixing phase. As to vocals, one of the main processes is to tune them. From the slightest imperfection to real hardcore tuning, one of the best plug-ins is Melodyne, which analyses the track bit by bit and breaks it down for you.
Another famous tool is Antares Auto-Tune, a real-time pitch corrector suitable both for studio and live performance. You can decide to use it in a more “humanized” way or put it to 100% wet and enjoy the alteration. Other things you need to look out for when editing are: noise, clips (when the audio signal is too loud and spikes up creating a glitch in the recording), and sibilant consonants like ‘s’ that can be easily defeated by a De-esser.
Production
After you’ve polished your tracks, it’s time for the second round of creativity, which is the production phase. We refer to production as the process where you add effects to your tracks, create transitions and add other sonic intrigue; put simply it’s here where you make your track unique. Here are some quick tips to spice up your production:
- Velocity: you made a sick beat but it feels a little bit too tight and dehumanized, especially if you quantized it to the bone. Try changing the velocity of the hits (especially hi-hats) to create a groovier and more natural rhythm!
- Sidechain: if there’s an effect you (almost) can’t go wrong with, this is it. Sidechaining consists of activating an effect through another track, that is set to a threshold. It is commonly used with Compressors and noise gates, especially between kick and bass to give that wonderful bouncy atmosphere.
- Reverse tracks: it can be a cool way of creating “organic” build-ups before you get to the chorus. Try reversing a snare and you’ll hear a nice ramp perfect to launch your drop!
- Vocal chops: if your song has a vocal track, try to slice it into pieces, especially with vowels, and use them as percussion! It can be an interesting and unique alternative to drum samples.
- Effects: this is not a proper tip, but effects are essential to your production! A delay in the right place can make a huge difference in your track. Whether you prefer digital effects (plug-ins) or outboard gear, experiment with your chorus, reverb, distortion and combine them to achieve incredible results!
Mixing
Mixing is an art of its own. It’s the process of gluing your tracks together to make them sound cohesive and complete. It’s usually carried out using tools like EQs, Compressors and Reverbs, as well as directly acting on your tracks’ volumes and panning.
A good way to get your song mix-ready is by grouping your tracks into coherent chunks, called STEMS. An example of stem could be a synth track and its effects, different snares grouped together, or a series of backing vocals. Once you’ve successfully streamlined your project, you can create a new one dedicated to mixing, so you can always go back to your original project to edit or retrieve elements.
Many DAWs offer mixing templates you can choose from, which come in handy if you’re mixing for the first time. One tip we can give you is to find out the overall feeling you want to convey with your song, and push it as much as you can while you’re producing. Try to have your tracks sounding as you want them to, rather than having to tweak them in the mix!
One of the pillars of mixing is EQ, short for equalisation. All sounds are made of frequencies, that are measured in Hertz. Equalising is the art of boosting, reducing and balancing all the frequencies in the mix to get a clear sound where all elements are present and work well together.
Mastering
What’s mastering? If you ask around, some people might tell you it makes the song “louder”. However, mastering is a very simple but subtle process, that requires great training and ears. The main things you achieve through it are: making the track’s perceived volume louder; making the track translatable to different kinds of speakers & making the track generally sound better.
If you’ve already mixed your song by yourself, a good tip would be to hand the mastering phase to a pair of fresh new ears… and speakers. In fact, a great deal of mastering depends on the speakers used and the acoustic treatment of a room.
The main tools for mastering are EQ, compression & a limiter. Compression is essential to balance out volumes because it makes loud parts sit in the mix and turns up quieter ones. It glues up all elements of the song to create a cohesive product. A limiter is the final stage in the mastering process. It’s a special kind of compressor that sets the overall loudness and makes the track competitively louder, without allowing any clipping or distortion to happen.
After mastering your track, it will be ready to be uploaded to all major digital stores and streaming platforms!
Conclusion
So we gave you all the tools and notions you need to start producing your own music. Even though it might be a daunting process in the beginning, nobody is born knowing everything. Just keep going and practising, trying out new gear and never be afraid of making mistakes!
If you liked this article, you might enjoy reading these ones as well:

.jpg?w=400&h=400&&fit=fill&bg=FFFFFF)


Responses & Questions